

These days, the bar for building a personal website has gotten a lot lower, thanks to AI-assisted tools like Claude Code and Codex.
You don't have to know how to code. Tell the Agent about your experience, projects, and ideas in natural language, and it can put together the pages, tweak the styling, and walk you through deployment step by step.
But a lot of people stop right there.
Just because your site opens in a browser doesn't mean an LLM can find it.
For many people, the doorway to answers has shifted from a search box to a chat window. You might not bother opening Google or Bing on purpose — you just go and ask ChatGPT, Perplexity, or another LLM with web search built in.
But an LLM won't automatically know your name, your projects, or your posts just because your site deployed successfully. It still has to discover your URLs from public web pages, read the content, and then decide whether to bring your page into its answer.
Here, Google and Bing are more like the underlying utilities — water and electricity. You may not open them on your own very often, but the foundational work of discovery, crawling, and indexing can't be skipped, and the crawlers used for AI search need to be able to get in too.
My own personal site fell into this exact trap. The site opened fine and articles kept going up, but I had no idea at first whether the search engines had indexed it at all, or whether AI bots had ever shown up.
So in this post, I want to teach you a completely free way to do the most basic GEO (generative engine optimization) for your personal site.
No paid GEO service, and no writing code yourself. Hand the on-site configuration to an AI-assisted Agent like Claude Code or Codex, and complete the Google and Bing account verification yourself.
I'm not an SEO professional, and this isn't a ranking playbook. I'm just laying out the whole process I ran through this time, the pitfalls I stepped into, and the real results.
Let me show you the results first.
I sent my domain to Claude and ChatGPT directly, and both could already read the site's public pages and describe its positioning, projects, blog, and other public sections.
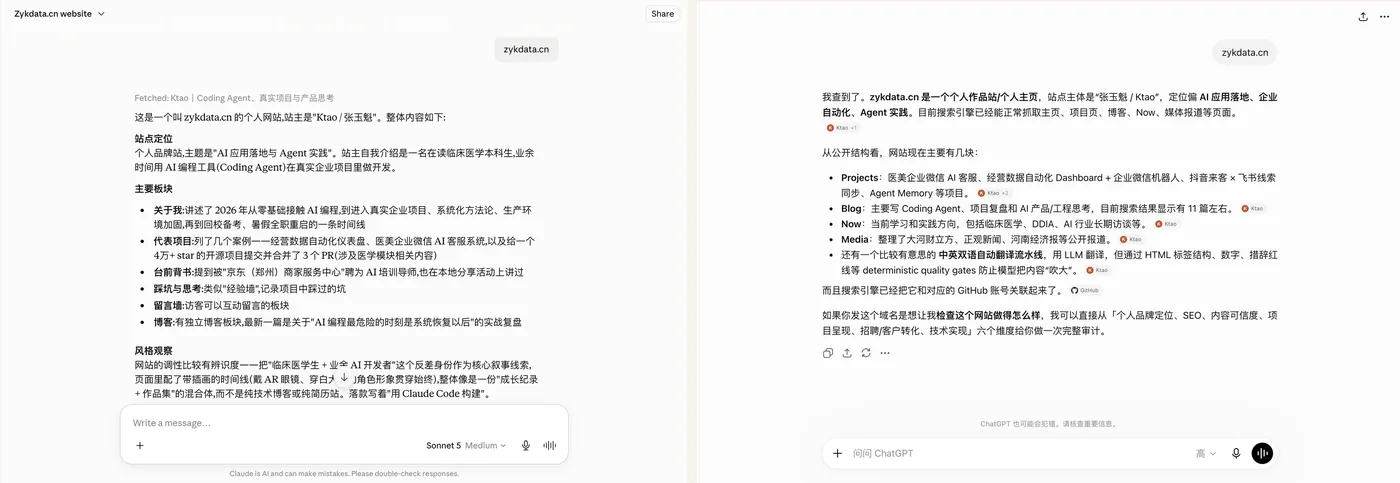
Left is Claude, right is ChatGPT. When searching online, both could find the homepage and summarize the positioning, projects, blog, and other sections from the public content.
To be rigorous here: this means they were able to find and read the site when searching online. It doesn't mean every LLM has permanently memorized this content, and it doesn't guarantee they'll cite it in every answer.
But before we start, we need to understand one term.
Indexing.
First, one term: what does indexing mean?
You can think of a search engine as a huge library.
Getting your site online is only like delivering a book to the library entrance. The URL opens fine, but the librarian doesn't know what the book is called, what's inside, or which shelf it belongs on.
A search engine usually discovers the URL first, then has crawlers read the page, and finally decides whether to put the page into its catalog.
That process of entering the searchable catalog is called indexing.
When you search for things on Google or Bing, they don't flip through the entire internet on the spot — they look through the index they've already built.
So if a page hasn't entered the index, people may still open it with the full URL, but it's hard for anyone to find it through search.
Being indexed doesn't mean ranking at the top, and it definitely doesn't mean an LLM will cite you. It just earns you a ticket into search results.
The robots.txt, sitemap.xml, and webmaster consoles we're about to configure have a really simple purpose.
To tell search engines where the site is, which pages they're allowed to read, and what public content actually exists on the site.
Before you start, here's the division of labor
| Task | Who does it |
|---|---|
| Log in to Google Search Console | Site owner |
| Add a DNS TXT record at the domain platform | Site owner |
| Log in to Bing Webmaster Tools and authorize the Google account | Site owner |
Check and generate robots.txt | Agent |
Check and generate sitemap.xml | Agent |
Check that public pages are accessible and don't have accidental noindex | Agent |
| Deploy the site | Agent can prepare; site owner confirms before execution |
| Investigate issues for specific URLs from Search Console | Agent |
We'll first get through the account, authorization, and DNS steps that the site owner has to complete by hand, then hand the remaining site configuration and checks to the AI-assisted Agent.
Never send your Google password, verification codes, or DNS platform password to the AI-assisted Agent. Clicking through the login and authorization yourself is the simplest and the safest way.
1. Register Google Search Console yourself first
Don't hand this part to the AI-assisted Agent — it requires logging into your Google account and editing your domain's DNS.
Open Google Search Console and click Add property.
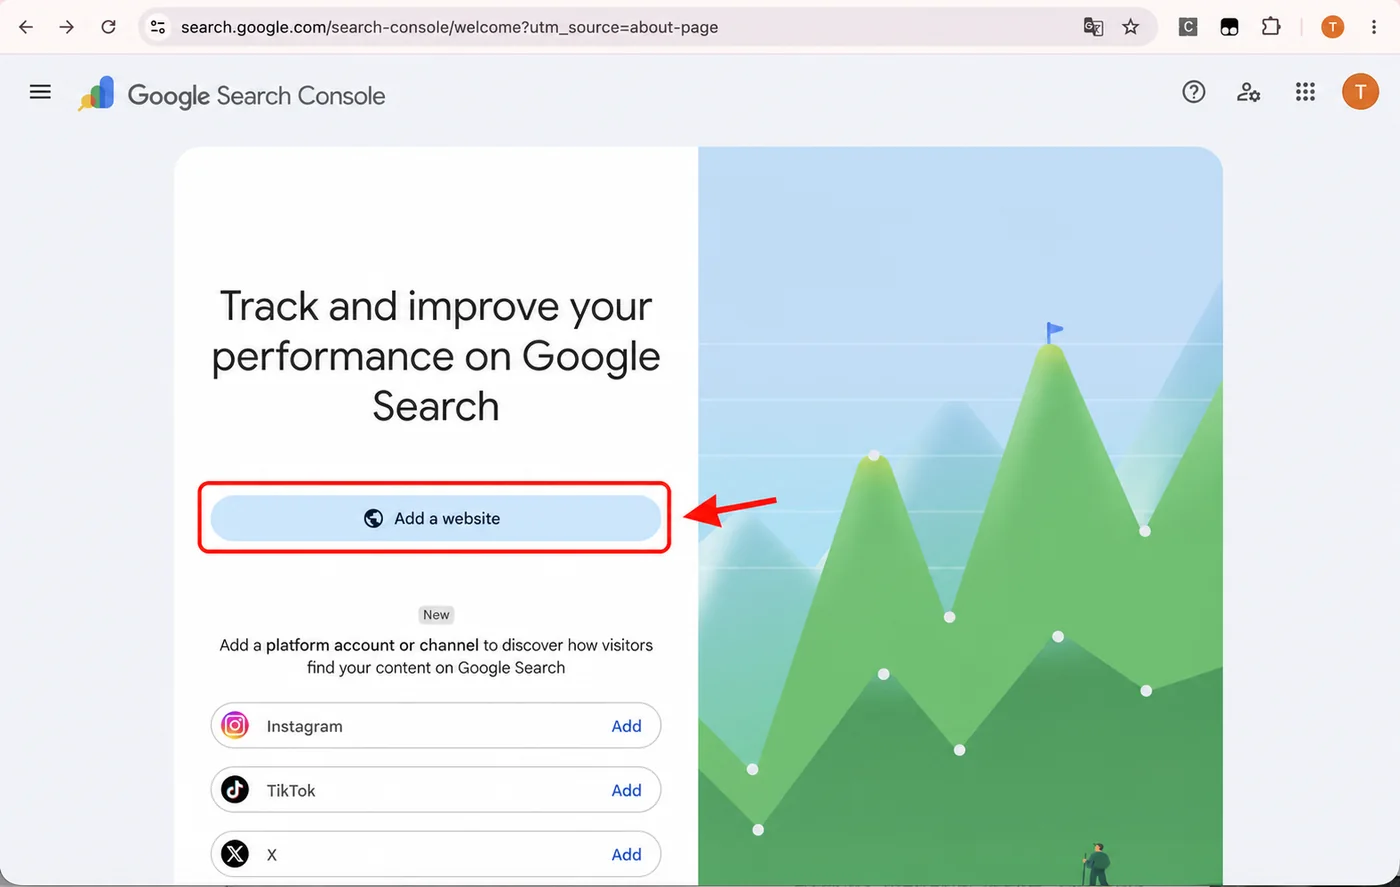
Click Add a website / 添加网站. The Google console sometimes shows English, but the button sits in roughly the same place as in the Chinese version.
Choose "Domain" here, then fill in only the domain — no https://, no path after it.
example.com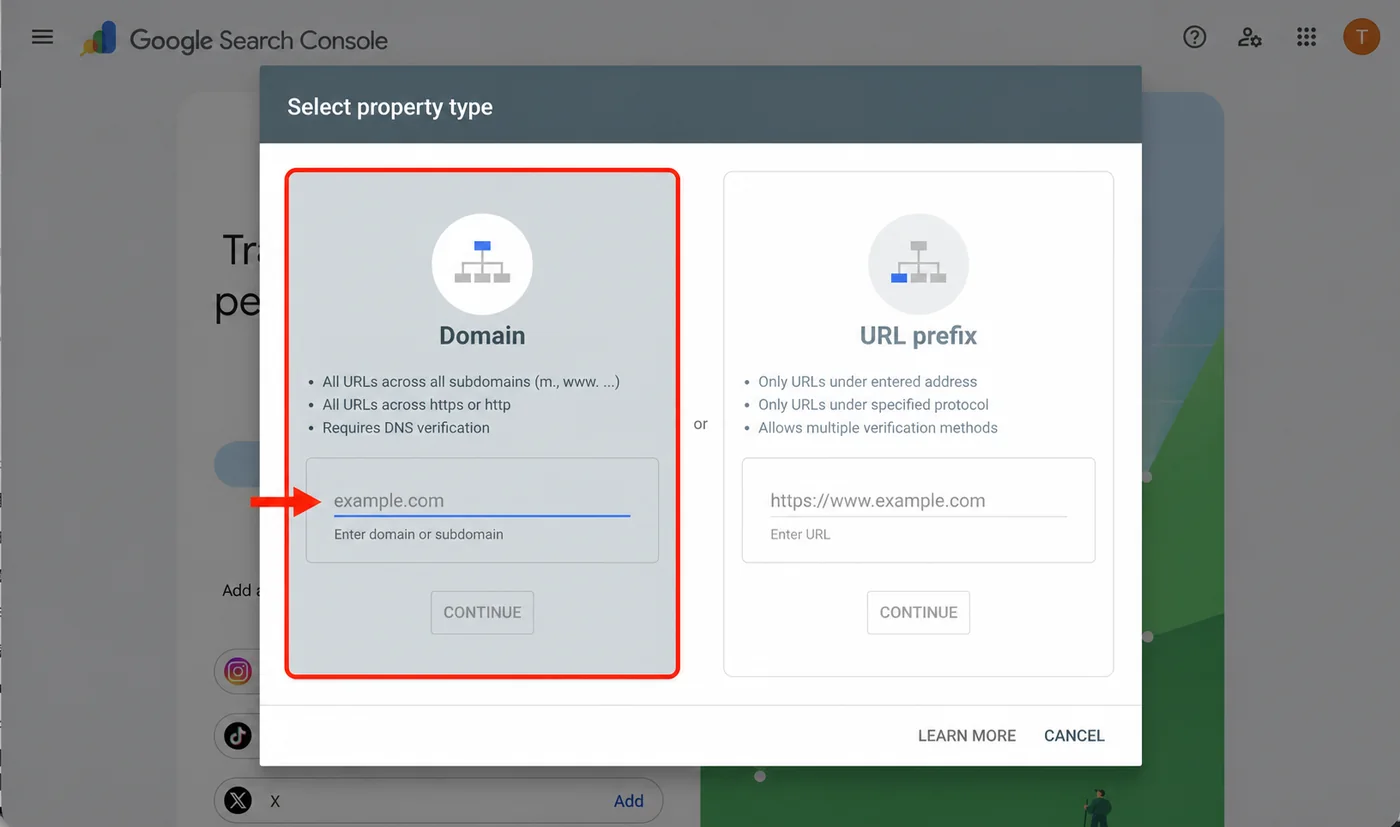
Select Domain / 网域 on the left and enter a bare domain like example.com; URL prefix / 网址前缀 on the right only manages one protocol and path, so you don't need it this time. Then click Continue / 继续.
Google will generate a TXT verification record.
Click Copy / 复制 and copy the entire verification string Google gives you. Don't copy only the second half, and don't post it publicly in tutorial screenshots.
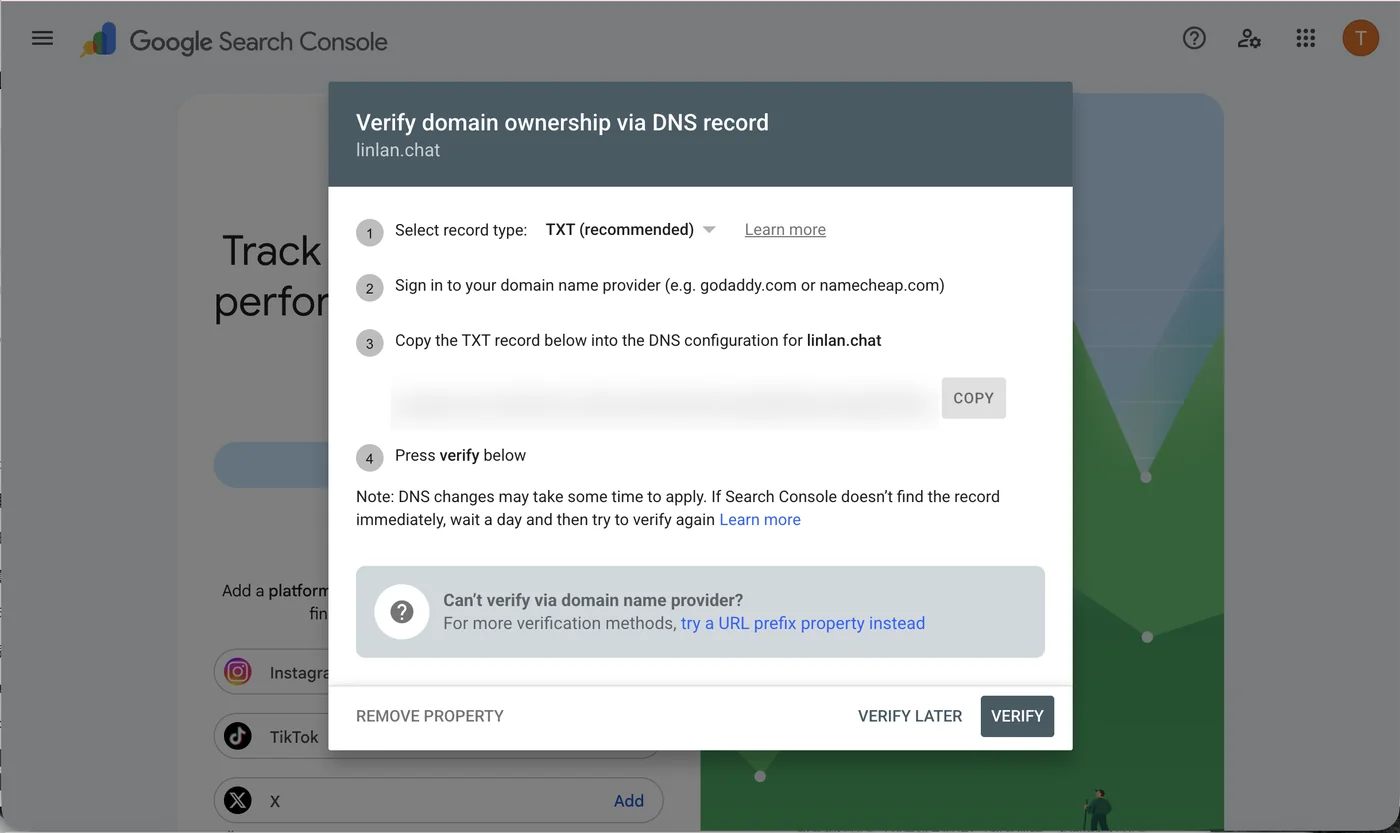
Keep TXT (recommended) / TXT(推荐), click Copy / 复制, then add the record at your domain registrar and come back here to click Verify / 验证.
Open the platform where you bought your domain and add a new record in DNS management. Below I'll demo it with DNSPod, Tencent Cloud's DNS service — the entry point is the Tencent Cloud DNS console. Other domain platforms may name the fields differently, but what you fill in is the same.
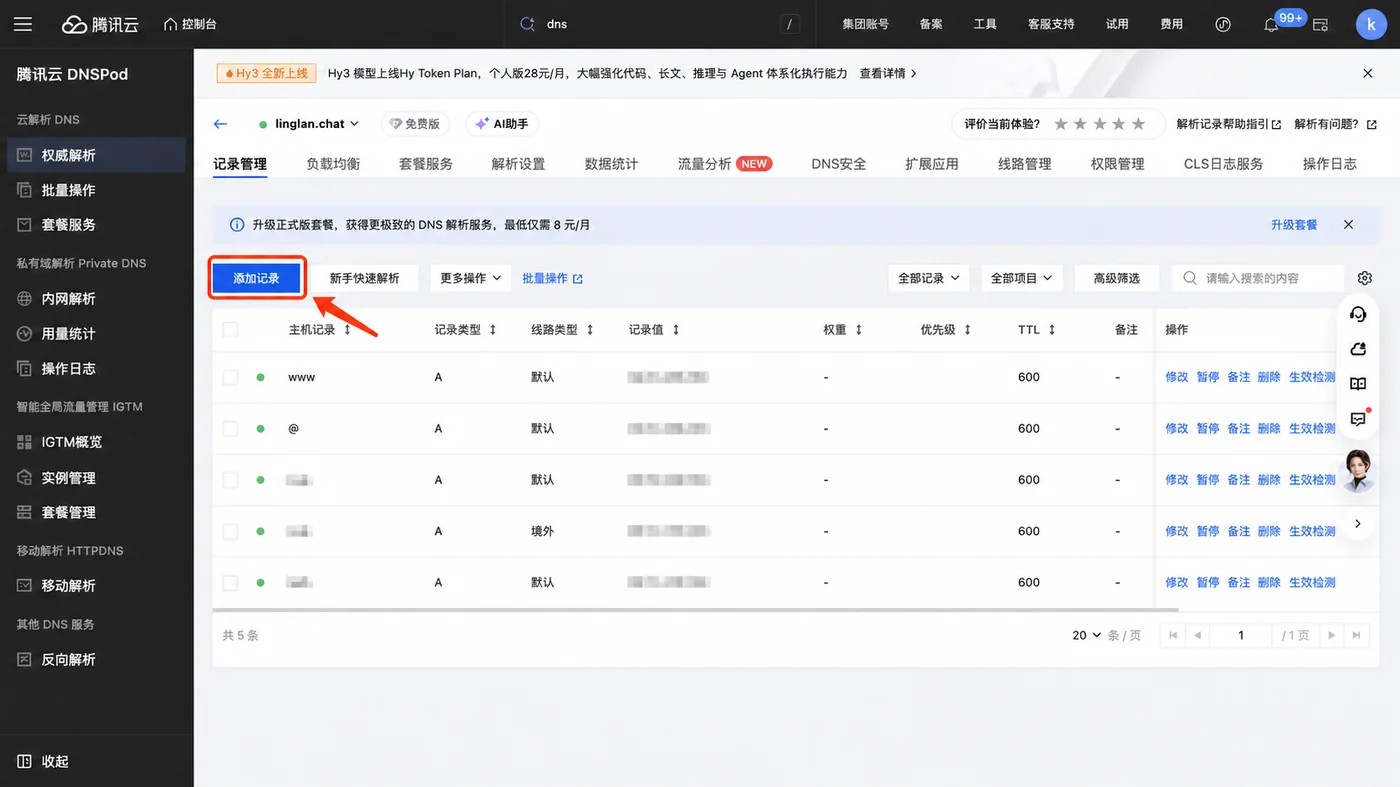
Select your domain, go to 记录管理 / Record Management, and click 添加记录 / Add Record. The server IP and the subdomains unrelated to this tutorial in the screenshot are blurred out.
Host record   @
Record type   TXT
Line type     Default
Record value  The full verification string Google provided
TTL           Default is fine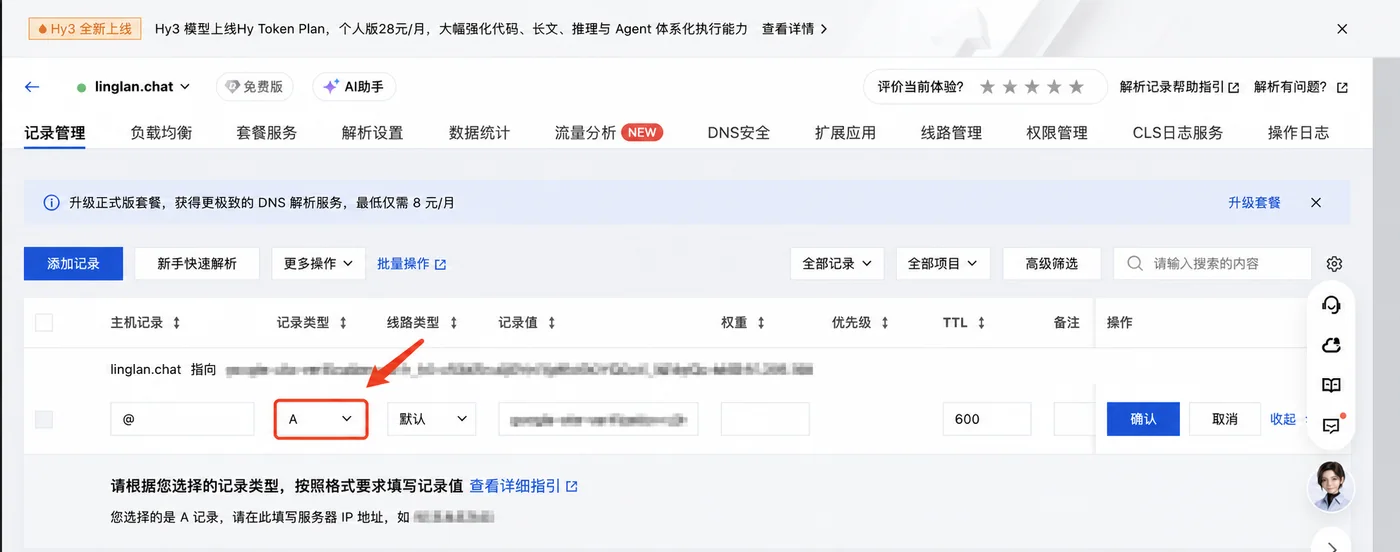
It's easy to hit confirm out of habit here. Even if you've pasted the verification value, it's wrong as long as 记录类型 / Record Type is still A. Don't save yet.
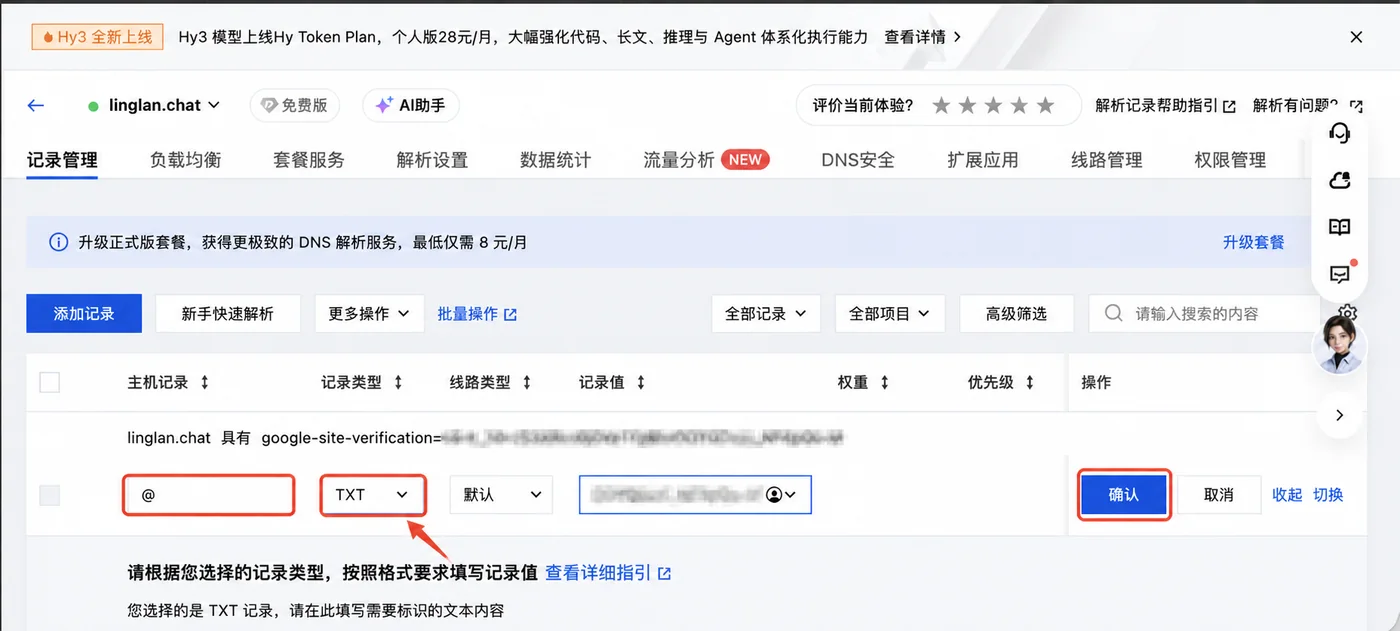
Change 记录类型 / Record Type to TXT, confirm 主机记录 / Host Record is @, then click 确认 / Confirm. The verification string is blurred out — everyone gets a different value.
After saving, go back to Search Console and click Verify.
DNS sometimes doesn't take effect immediately. If verification fails the first time, don't keep editing the record — wait a few minutes and try again.
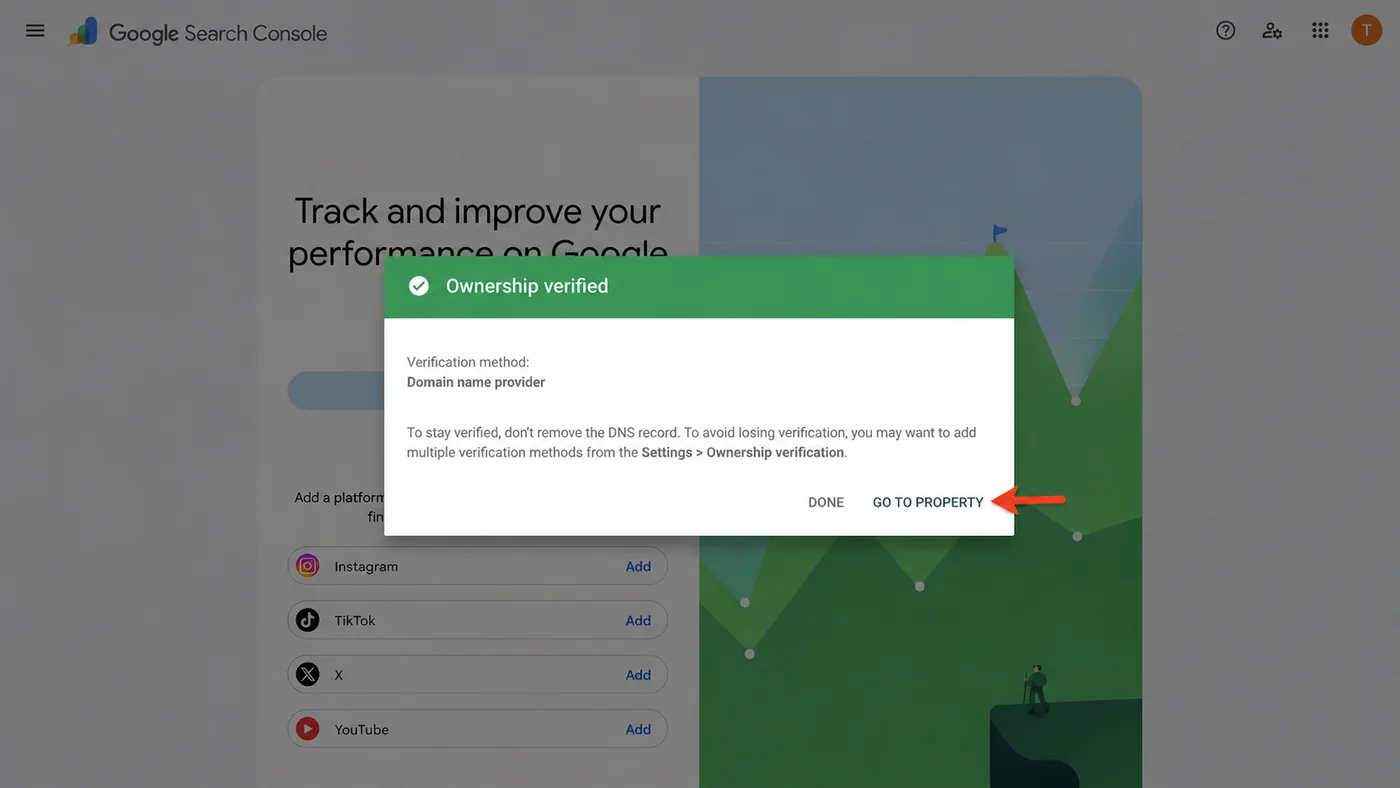
When you see Ownership verified / 所有权已验证, you've succeeded. Click Go to property / 前往资源 to enter the console. Google will also remind you not to delete the DNS record you just added, or you might lose the verified status later.
Once you're in, it's normal for a new site to show Processing data, please check again in a day or so / 正在处理数据,请过一天左右再查看 — that's not a configuration failure. Next, click Sitemaps / 站点地图 on the left.
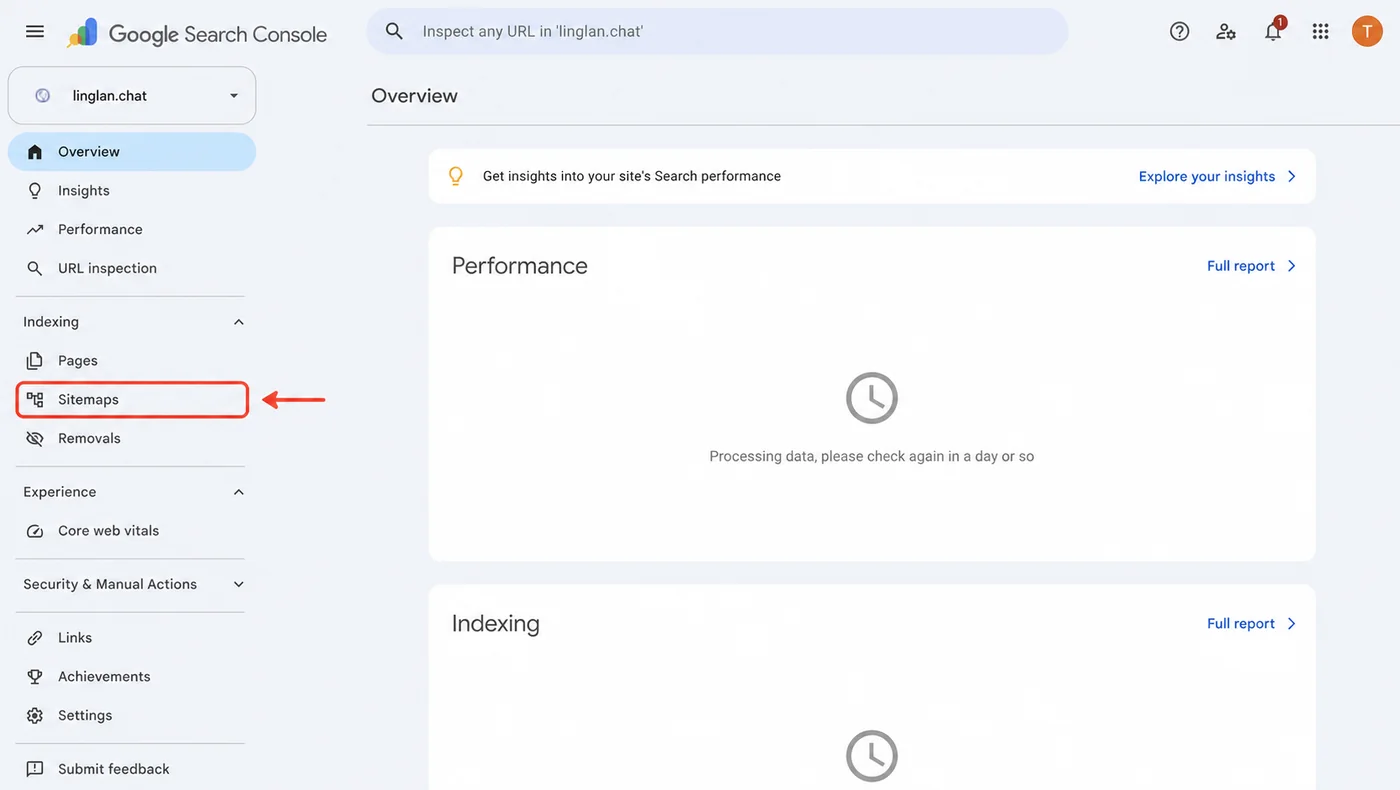
The red box highlights Sitemaps / 站点地图. The data cards for a new site are still processing, but that doesn't stop you from submitting the sitemap.
First open https://YOUR_DOMAIN/sitemap.xml in a new tab. If you can see XML with a set of public URLs, continue to submit; if it shows 404, a blank page, or an error, skip this step and come back after the AI-assisted Agent generates and deploys the files. Your Google and Bing verification won't be invalidated by that.
Here are Google's official sitemap docs. You don't need to read all of it the first time — just follow the steps below to submit, and come back if you hit a format problem.
I tripped over a really small pitfall here that easily stumps beginners.
The first time, I only filled in:
sitemap.xmland the page said the address was invalid.
It only submitted successfully after I switched to the full address:
https://YOUR_DOMAIN/sitemap.xmlSo if you also added a "Domain" property and get an invalid sitemap address, try the full URL first. Don't rush to have the AI-assisted Agent rewrite the sitemap.
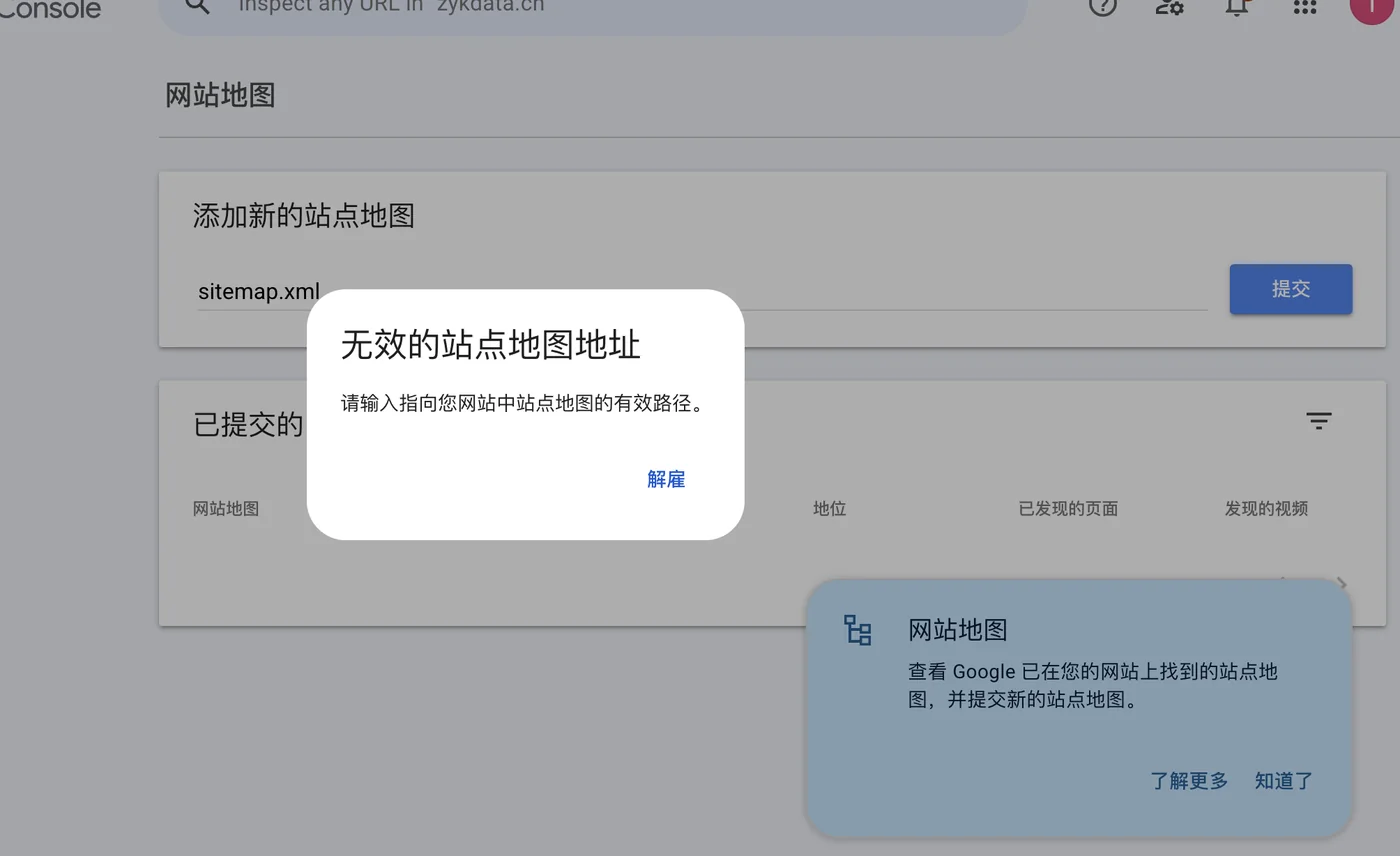
That's the real error I got at the time. It submitted fine after switching to the full https://YOUR_DOMAIN/sitemap.xml.
After submission, Google starts discovering and crawling pages. A new site won't rank immediately just because you submitted a sitemap — this step only hands the site over to Google's management, so you can later see crawling, indexing, and error reasons.
2. Then import the site from Google into Bing
Once Google verification is done, open Bing Webmaster Tools.
Click Get started / 开始使用 and choose Google as the sign-in method — use the same Google account you just used to verify Search Console.
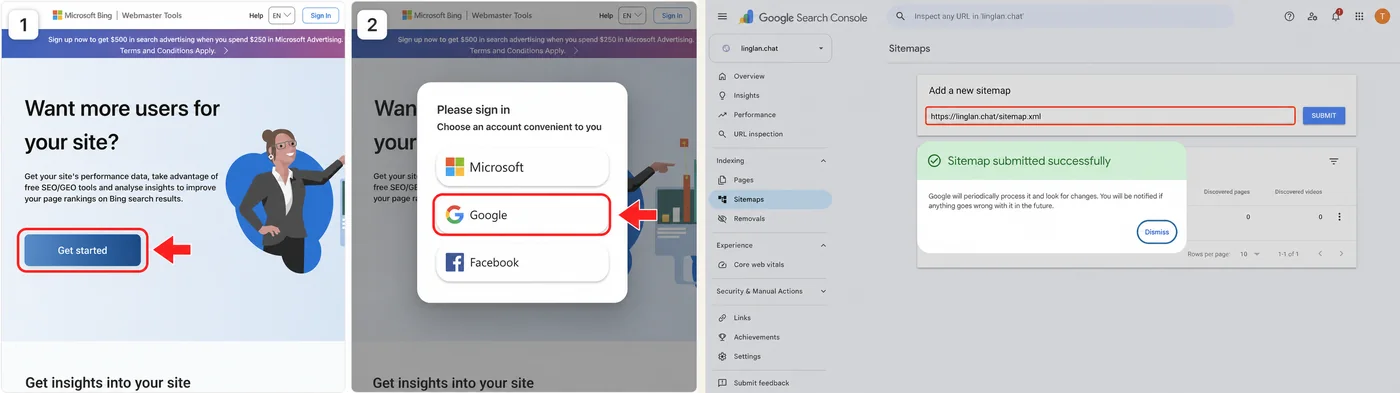
The left is image 13 from earlier: after entering Bing, click Get started, then choose Google to sign in. The right is image 12: a valid sitemap will eventually show Sitemap submitted successfully / 站点地图提交成功. If your sitemap isn't ready yet, the right-side step can wait until after the AI-assisted Agent deploys.
After signing in, choose Import your sites from GSC / 从 Google Search Console 导入网站. If your console's entry point doesn't match the screenshot, check Bing's official import guide.
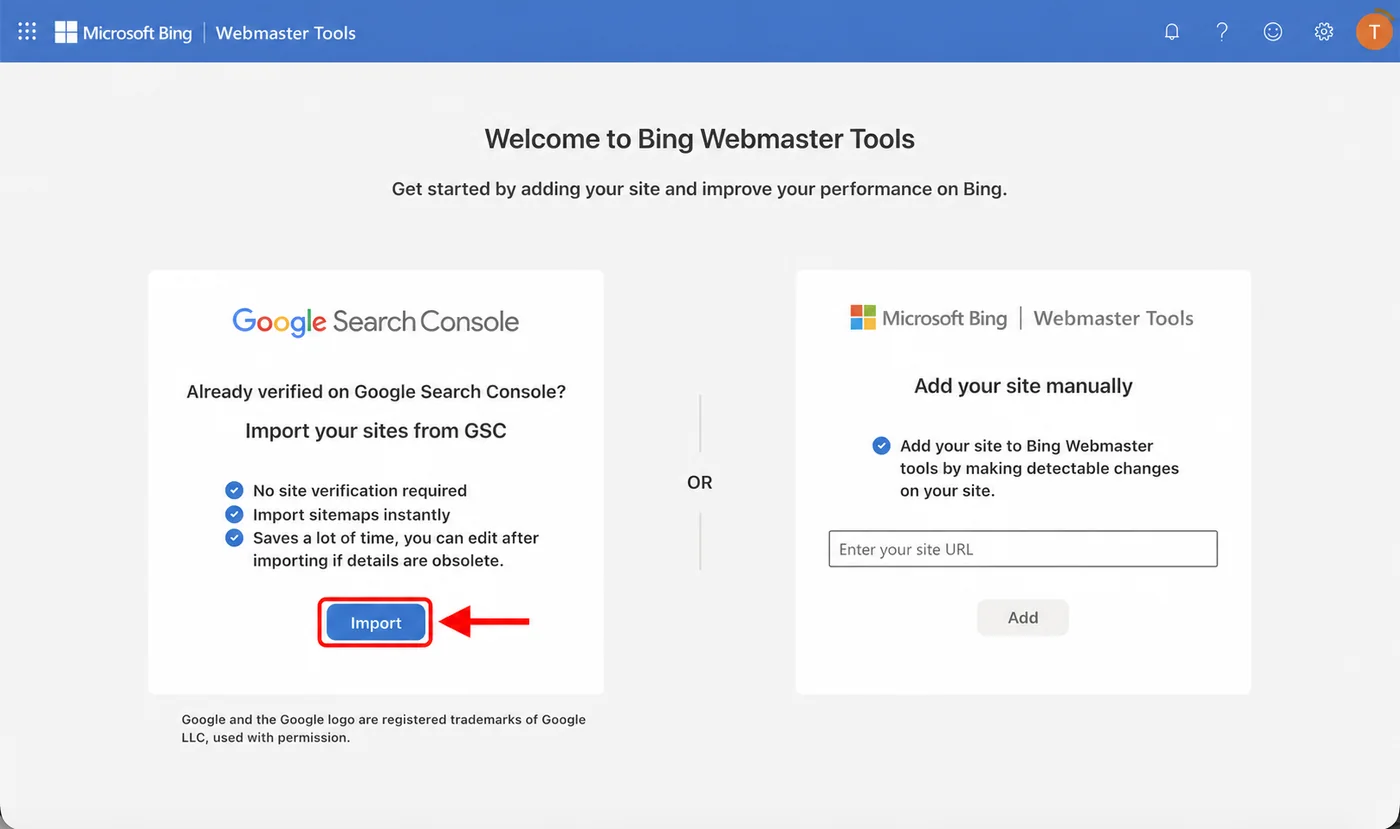
Choose the import option on the left instead of manual add on the right, so you don't have to verify site ownership a second time.
Bing will explain what data it's about to read. It's asking for read-only access, to read your verified site and sitemap and to periodically re-confirm the verification status. After confirming, click Continue / 继续, then complete the Google authorization.
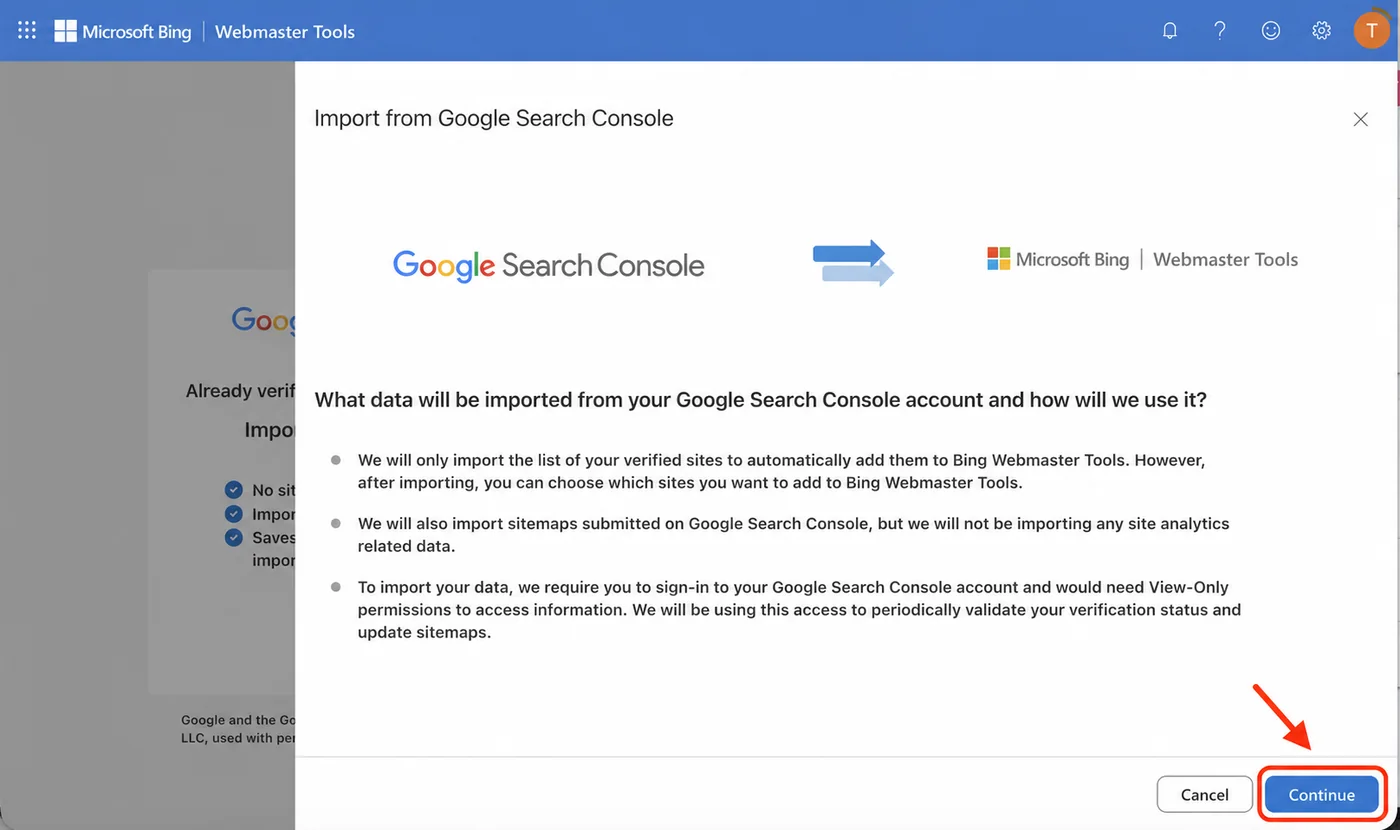
After reviewing the explanation, click Continue / 继续 in the bottom-right corner. The Google password and authorization are still handled by the site owner themselves.
Once authorized, check the site you want to import and click Import / 导入 in the bottom-right corner.
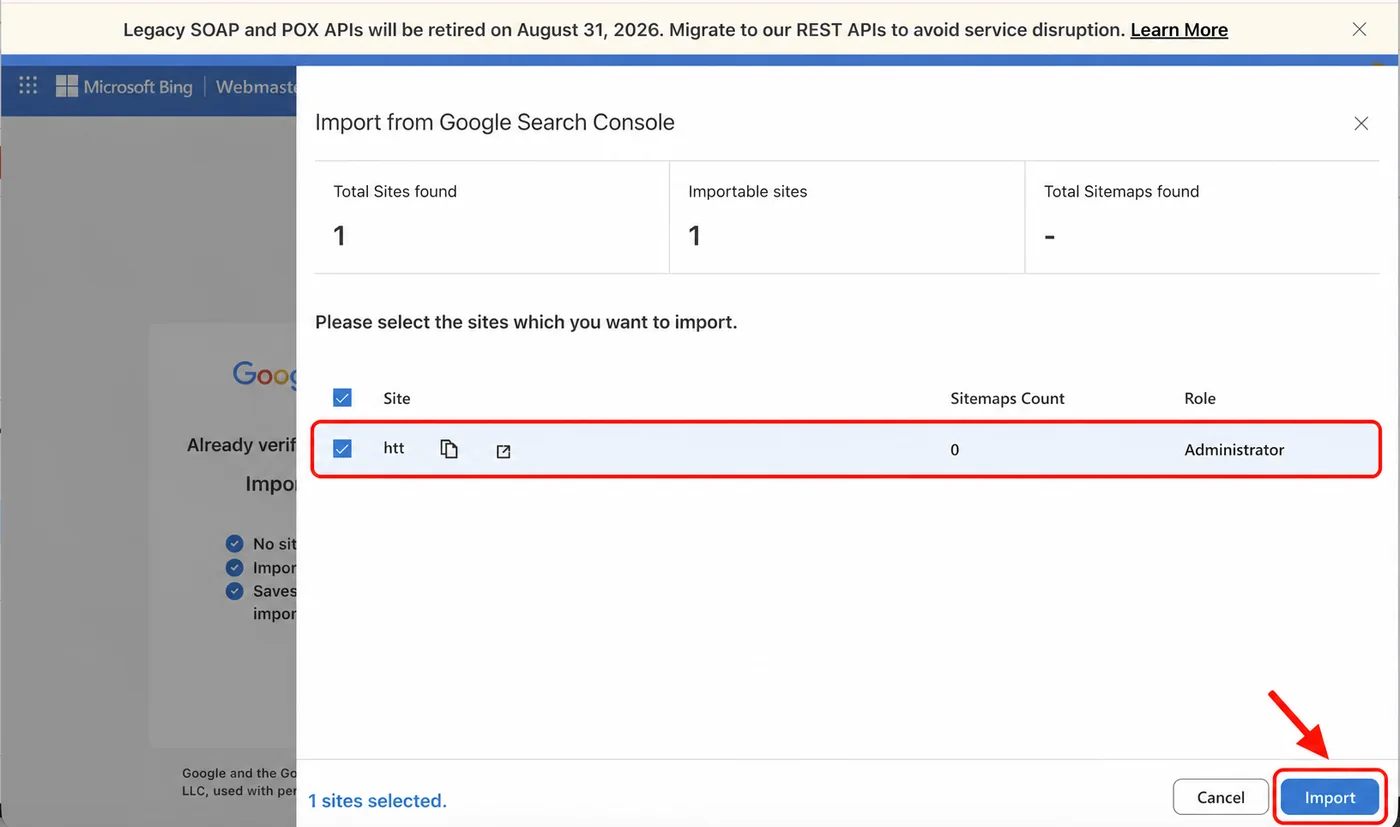
After the import succeeds, there's no need to add another verification record at DNSPod. But Sitemaps Count showed 0 on this page, which means the sitemap didn't come along with it.
Bing's docs say it can import the sitemap you already submitted to Google, but the actual result isn't always successful. Don't rely on gut instinct — just look at Sitemaps Count. If it's 0, submit it once manually in Bing.
In the Bing console, click Sitemaps / 站点地图 on the left.
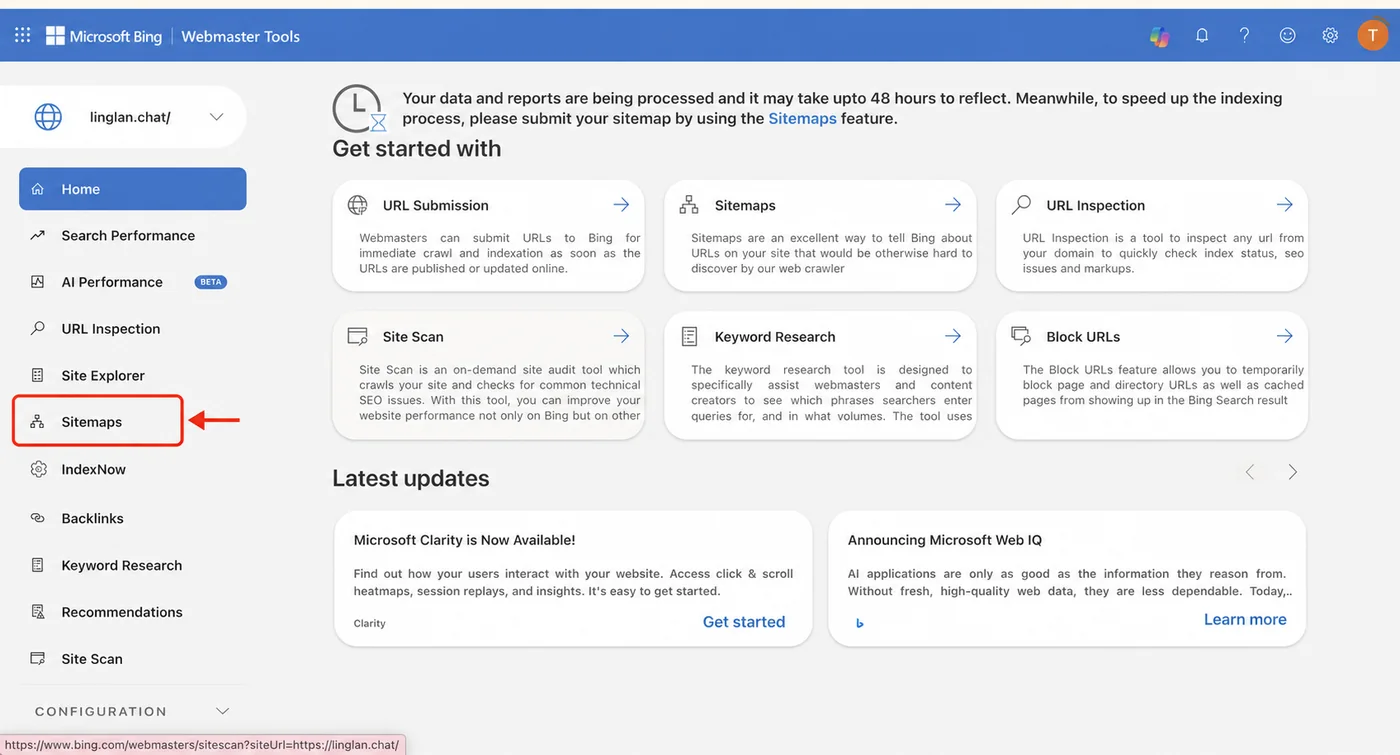
A banner at the top will say data can take up to 48 hours to process and suggest submitting your sitemap through the Sitemaps feature. Fill in the full address https://YOUR_DOMAIN/sitemap.xml here too.
Once that's submitted, the Google and Bing registration is complete. From here, don't stare at it every day — just let the platforms discover and process the pages at their own pace.
After Bing is connected, if you want new pages to show up faster, you can have the AI-assisted Agent wire IndexNow into the publishing flow following the official IndexNow docs. This is optional — skipping it doesn't affect the basic Google and Bing registration — so this tutorial won't go deeper into it.
3. Hand the remaining site configuration to the AI-assisted Agent
With the Google and Bing account steps done, the remaining on-site configuration can be handed to the AI-assisted Agent. The site needs at least two files.
One is robots.txt, which tells search engines which pages they may crawl.
The other is sitemap.xml, which tells search engines which public pages exist on the site.
If you don't know whether your site already has these two files, check in a browser first.
https://YOUR_DOMAIN/robots.txt
https://YOUR_DOMAIN/sitemap.xml
Opening normally doesn't mean the content is correct, so I'd rather have the AI-assisted Agent check directly.
You can send the following prompt to Claude Code, Codex, or any other AI-assisted coding Agent that can read your site's code.
Please configure basic search-engine indexing for this personal website.

Before you start, read the project rules and run git status; keep any existing changes. Check first — do not publish yet.

Please complete these items.

1. Check whether the site already has robots.txt; create one if not, review the content if it does.
2. robots.txt should allow Googlebot, Bingbot, and ordinary search crawlers to access public pages by default.
3. Private pages, admin pages, and anything explicitly not meant to be public should not enter the index.
4. Check whether sitemap.xml already exists; if not, generate it from the actual public pages.
5. The sitemap should only include public pages that return 200, allow indexing, and use the official HTTPS address.
6. If the site keeps adding posts, make the sitemap update automatically at build or publish time — don't maintain it by hand long-term.
7. Check public pages for accidental noindex and confirm canonical points to the site's official URL.
8. Check the public addresses robots.txt and sitemap.xml should use after deployment.
9. After making changes, run the project's existing tests and tell me which files you changed and which steps I need to complete myself in the Google or Bing consoles.

Don't add paid services, don't bulk-generate SEO articles, don't modify existing article content, and don't commit, push, or deploy — wait for my confirmation.
The most important part of this prompt is the last line.
Have the AI-assisted Agent change and check things first, but don't go live directly. When it tells you which files it changed and the check results, confirm, then deploy.
A minimal robots.txt looks roughly like this.
User-agent: *
Allow: /

Sitemap: https://YOUR_DOMAIN/sitemap.xml
If the site has paths you don't want search engines to access, you can add them separately.
Disallow: /private/But note: robots.txt is not a vault for privacy. Truly private pages must have login or authentication — you can't rely on a single Disallow.
If you want your site to have a chance of being read by ChatGPT Search, you can also have the AI-assisted Agent allow OAI-SearchBot separately. It and GPTBot, which may be used for training crawls, can be set up as separate entries.
If you want to confirm what each of these crawlers does, see OpenAI's official bot documentation.
User-agent: OAI-SearchBot
Allow: /

User-agent: GPTBot
Disallow: /
This is not required for the Google and Bing registration. If you'd rather not think about AI crawlers yet, skipping it won't affect the rest.
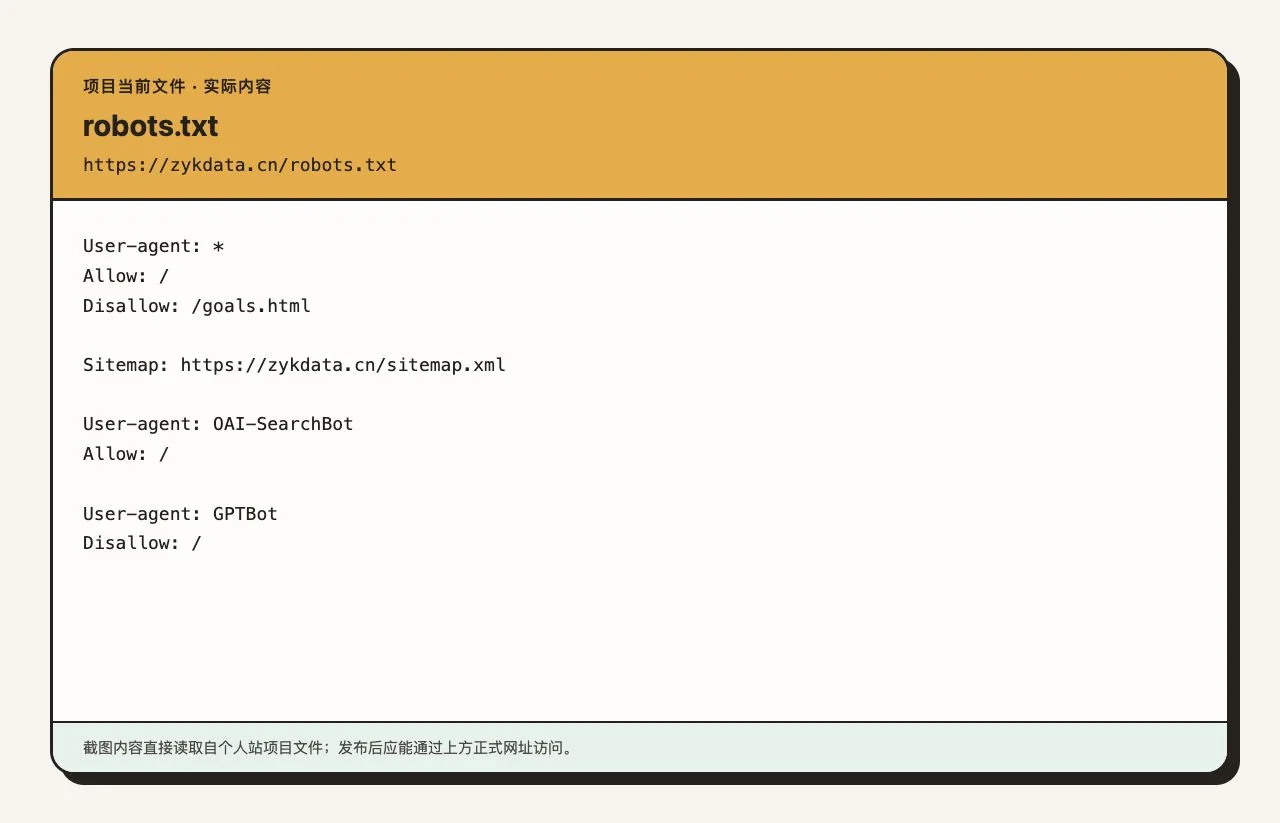
This is the configuration I use now: public pages allowed to crawl, private target pages excluded, and OAI-SearchBot and GPTBot set up separately.
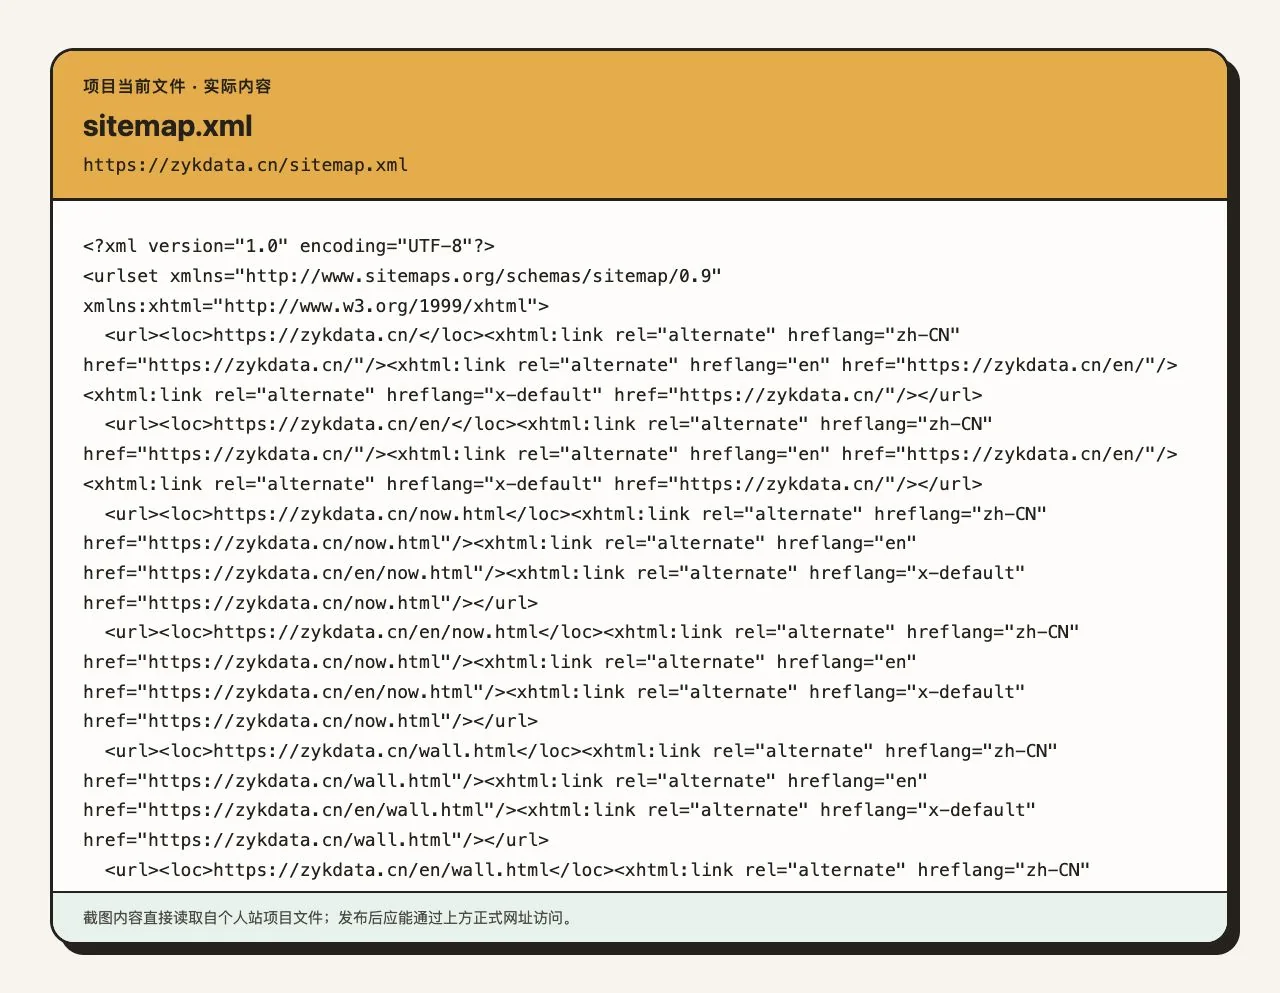
The sitemap uses official HTTPS addresses and updates automatically as the blog builds.
Once the AI-assisted Agent finishes the changes and they pass the checks, have it deploy.
You can continue with this message.
I've confirmed the changes. Please go live following this project's existing release flow — don't bypass tests, don't commit unrelated files. After publishing, check that robots.txt and sitemap.xml are reachable through the official domain, and confirm the homepage and at least one article page return 200.At this point, the on-site preparation is done.
If you skipped the submission earlier because sitemap.xml didn't exist, now just go back to Google and Bing one last time and enter the full address once in each.
https://YOUR_DOMAIN/sitemap.xmlI still recommend doing this step yourself, because the webmaster consoles involve account login. The AI-assisted Agent can check the address and file content, but it doesn't need your Google or Microsoft password.
4. How to tell whether it's working
After the site is registered with the search engines, the easiest mistake to make is searching site:YOUR_DOMAIN on Google every day.
I got misled exactly that way.
We submitted the site for indexing together on July 31. By August 3 — three days after submission — site:zykdata.cn still returned no results, and I briefly thought Google hadn't indexed it.
But by August 5 — the fifth day after submission — going through Search Console's URL inspection data item by item, the real results already looked like this.
| Platform | Indexed | URLs in sitemap | Index rate |
|---|---|---|---|
| 47 | 48 | 98% | |
| Bing | 3 | 48 | 6% |
Even when submitted on the same day, Google and Bing can process at very different speeds. Google had indexed 47 pages here while Bing only had 3 — that doesn't mean the Bing setup failed. The two platforms just have different rhythms for discovery, crawling, and indexing.
So it's normal to see nothing in the first few days after a new site is submitted. Don't repeatedly delete the sitemap, change DNS, or re-verify just because you can't find anything the next day. Wait 3–7 days first, then look at the real status in the webmaster consoles; with more pages or a newer site, the wait can be even longer.
By August 8, about a week after the coordinated submission, the Claude and ChatGPT results shown earlier could already find and summarize this site's public content when searching online. That timeline is closer to the real situation: submit first, wait for the platforms to process patiently, then look at the results.
This data can't prove that completing the setup will always get 98% indexed, and it can't prove GEO will immediately bring traffic. It only proves two things.
The site's discovery and indexing pipeline is working correctly.
Whether a page is indexed is judged in each platform's own webmaster console — not from a single search result.
If you want to check an important article, enter the full URL in the search bar at the top of Search Console and use URL Inspection.
Focus on whether the page can be crawled, whether it's allowed to be indexed, and whether the canonical URL Google picked is your own official URL.
If it shows "Discovered – currently not indexed" or "Crawled – currently not indexed", it's not necessarily a code error. New sites and new articles can both need time.
If Search Console sends an email mentioning these reasons, don't panic either.
Alternate page with proper canonical tag
Excluded by noindex tag
Page with redirect
They mean, respectively: an alternate page points to the canonical page, the page intentionally opts out of indexing, and the current URL redirects to another URL.
These situations are often normal. HTTP redirecting to HTTPS, a private page deliberately set to noindex, or duplicate URLs pointing to the official canonical — none of these need fixing.
What actually needs to be done is opening the example URLs and checking whether they include the homepage, articles, or project pages you originally wanted to be found.
If they do, hand those specific URLs to the AI-assisted Agent to investigate.
Google Search Console reports that this URL is not indexed.

URL
PASTE_THE_URL

Reason
PASTE_THE_FULL_REASON_FROM_SEARCH_CONSOLE

Please inspect the site's source code and deployment configuration, focusing on the HTTP status code, redirect chain, robots.txt, meta robots, canonical, hreflang, and whether it's correctly included in the sitemap.

First tell me whether this status is intentional or an actual fault. Only make changes after you've confirmed it's a fault. After changes, run the project's tests, but don't publish on your own.
The most important sentence in this prompt is determining whether it's actually a fault first.
Not every "not indexed" status needs to be fixed.
Finally, did the AI bots actually show up?
The Google and Bing data can only prove that the search-engine pipeline is working.
I also wanted to double-check one more thing.
Those AI-search robots — did any of them actually visit my site?
So I went back and checked the server's Nginx access logs. This time, I didn't just look at the User-Agent, because it can be spoofed. I cross-checked the request sources against the IP ranges officially published by OpenAI and Perplexity, and kept only the records that passed verification against official network ranges.
The strongest record showed up on the morning of July 30.
OpenAI's OAI-SearchBot read the full text of a published tutorial, 17 images, the CSS, the JS, the English version, and the feed — all in less than a minute. All the request sources also fell inside the SearchBot network range officially published by OpenAI.
The site's separate logs from the following days also show it checking robots.txt 14 times between August 3 and August 8, returning a normal 200 each time.
PerplexityBot also passed the official network-range verification. It actually read the homepage, a public case-study page, the related images, and robots.txt — all 4 requests returned 200. According to Perplexity's official documentation, this bot is used to give websites a chance to appear in Perplexity search results, not to crawl data for foundation-model training.
| Time | Verified bot | What actually happened |
|---|---|---|
| July 30 | OAI-SearchBot | Read a tutorial's full text, 17 images, and page assets in under a minute |
| August 3–8 | OAI-SearchBot | Checked robots.txt 14 times; all returned 200 |
| August 3–4 | PerplexityBot | Read the homepage, public case-study page, images, and robots.txt; all returned 200 |

This image only shows requests verified against OpenAI's official SearchBot IP range, and the source IPs have been removed.
The OAI-SearchBot full-text read happened before I registered with Google and Bing, so I can't credit it to Search Console or Bing integration.
What it proves is that AI search crawlers that are allowed access can already find and read this site's public content.
I made the same distinction for OpenAI on this site: allowing the search-oriented OAI-SearchBot while blocking GPTBot, which may be used for training crawls.
Crawling isn't indexing, and indexing isn't the same as an LLM eventually citing you.
But at least, this pipeline has really started working.
GEO isn't all that mysterious either.
First, make sure the search engines and the AI bots that are allowed access can find you and read your public pages, and that you have somewhere to check when something goes wrong.
Do that, and your personal site stops being an island that only you can find — and only with the URL in hand.
Original article link: https://zykdata.cn/blog/2026-08-08-personal-site-geo-zero-cost.html